
Designing St. Patrick’s Day Clover Cards | Inside the Studio
- Shannon Cyr

- Mar 12
- 7 min read
A look inside the studio as a St. Patrick’s Day clover design takes shape—from familiar Irish traditions and an early handmade card to today’s original mosaic paper art.
Growing up Irish
I’m part Irish. My grandfather’s family is from County Cork, and I was named after the River Shannon that runs through it.

Growing up, St. Patrick’s Day was a holiday I always looked forward to. It felt connected to my family heritage, and I loved celebrating a tradition that invited everyone to join in and become Irish for a day.
It was a time of parades and parties. I remember watching the Boston St. Patrick’s Day parade on TV and seeing entire streets filled with people wearing green, waving flags, and celebrating together. Even as a kid, it felt like a big, joyful moment of shared heritage.
What enchanted me most, though, were the images and bits of folklore: shamrocks, leprechauns, and the idea that somewhere a pot of gold might be waiting at the end of a rainbow.
In Irish folklore, leprechauns are mischievous red-bearded fairy creatures said to guard hidden pots of gold. Legend says they’ll grant three wishes if you manage to catch one.
As a child, that world felt magical. St. Patrick’s Day wasn’t just a holiday; it was a time when luck, folklore, and imagination were all around.
Crafts, creativity, and the joy of making
St. Patrick’s Day always came with crafts and greeting cards.

We cut clovers from cardstock, made shamrock banners, and assembled those big cardboard leprechauns with brass fasteners in their elbows and knees so their arms and legs could swing around. Once they were finished, we’d hang them up like decorations and twist their limbs into all sorts of silly poses.
The house filled with all kinds of St. Patrick’s Day decorations too—melted plastic “popcorn” art shaped like shamrocks or leprechauns, honeycomb paper centerpieces that opened into little 3D scenes, and paper decorations for windows and walls covered in shamrocks and leprechaun figures.
And then there were cards
The greeting cards captured the spirit of the holiday. I remember buying little packs of St. Patrick’s Day cards like the ones pictured here—cheerful, simple, and full of charm.
At home I would spread the cards across the table and start doing the math: how many cards did I have, and who should receive them. I wrote short notes inside, addressed the envelopes in careful handwriting, and lined them up with stamps so they were ready for the mailbox.
The cards went to my grandparents, great-grandparents, cousins, and friends—anyone who might enjoy a little extra luck arriving in their mailbox on St. Patrick’s Day.
Given that history, it isn’t surprising that St. Patrick’s Day eventually made its way into my studio.
First St. Patrick's Day clover card
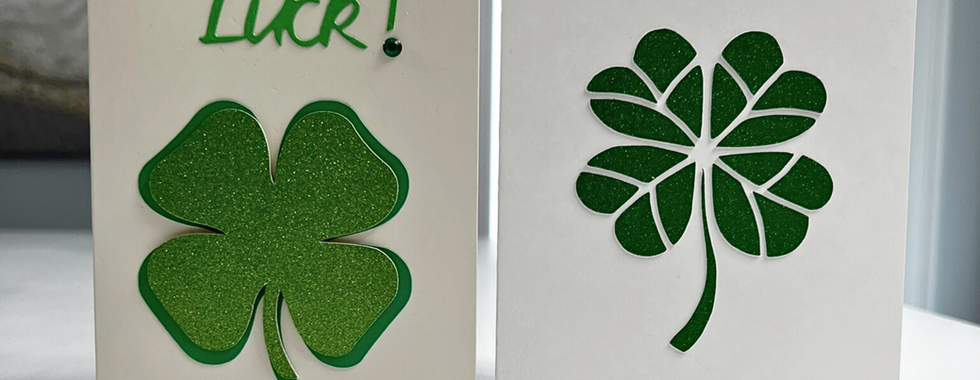
One of the first handmade greeting cards I made featured a St. Patrick’s Day clover.
At the time, I was still learning my tools and experimenting with what paper could do. I paired my Cricut Maker with a Sizzix die—partly out of curiosity and partly because those were the tools I knew how to use.

The clover itself was cut with the Cricut. I found a design I liked and scaled it to the sizes I wanted, layering two different papers and adding a small bumper underneath so the clover would lift slightly off the card.
The wording, “Good Luck,” came from a Sizzix die. I wasn’t confident enough to cut lettering with the Cricut yet, and I was still feeling precious about paper.
When I finished assembling the card, I showed it to Michael. He loved it and said it was his favorite card I had made so far. He also suggested adding an exclamation point to make the message more declarative.
He was right. The exclamation point immediately made the message feel more alive. I added a small green jewel for the punctuation, partly for interest, partly for dimension, and partly because I love sparkle.
I was incredibly proud of that card.
Looking at it now, I can see all the things I didn’t know. The card itself is an irregular size, the paper has a disturbingly smooth finish, and the color isn’t quite white. More like eggshell. None of that registered then. I was simply focused on one question: can I even make a handmade greeting card?
Back then I didn’t understand anything about cardstock. I ordered packs of blank folded cards and envelopes online without any real understanding of paper weight, texture, color, or how those choices affect the final piece. I also hadn’t yet learned that embellishments like that small jewel can create real challenges in healthcare settings. Today that’s one of the reasons I have standards for the cards I donate.
Despite all of its flaws, what I feel most isn’t embarrassment. It’s love. Love for the version of me who was willing to try.
Back to the clover
Years later, the clover returned in a very different form.

I had been experimenting with mosaic-style paper designs for Mainely Cards Valentine’s Day cards. I was drawn to the way individual pieces can come together to create a single form. The clover felt like an interesting place to explore that idea.
For this design, I leaned into the floral character of the clover.
I kept the familiar four-leaf form, but instead of treating it as a single solid shape as I did with my first card, I separated each leaf into segments that radiate outward from the center.
From there, I shaped the interior lines so they flowed through the leaf. I kept the segments rounded and slightly asymmetrical to soften the clover and help make it look more organic.
I added a curved stem to draw the eye upward into the center, creating a subtle sense of movement. The intention was to create a clover that suggests growth and bloom.
Cutting the clover
Once the design was digitized, it was time to test it on paper.
I rely on the Cricut Maker 4 to cut the tiny paper components that make up my designs. For these clover card prototypes, I used emerald green no-shed glitter cardstock. I love how it changes in the light, adding to the sense of movement.
Once the cut is complete, the design is barely visible. Look closely at the image below and you can see the faint cut lines. Each piece remains embedded in the sheet of glitter cardstock. The pieces only begin to appear during the next step: weeding.
Weeding is the process of removing the excess paper around the design and lifting the individual pieces from the cutting mat. The name sounds like gardening, which honestly isn’t far off—and it’s just as satisfying. You work slowly, lifting away the extra bits while trying not to disturb the pieces you actually need.


With mosaic designs, patience is essential. The pieces sit close together, and no-shed glitter cardstock has a thick backing layer that can easily separate at sharp angles. If you rush the weeding process, the glitter layer can tear away from the backing and ruin the piece.
Assembling the clover
Once the paper pieces are safely freed from the cutting mat, I can exhale and settle into the creative flow of building the clover, one piece of paper at a time.
It’s a lot like solving a small, timed puzzle.
Each piece has to be lifted without bending or tearing, and positioned precisely on the card. Then a tiny amount of glue is added and the piece is placed. Too much glue creates a glob that can spread to neighboring pieces or leave unwanted texture on the card. Too little and the piece sticks to your fingers, your shirt, or whatever happens to be closest. There’s a short window of time to adjust placement before the glue sets. Once it dries, that’s it. There’s no shifting it or trying again.
With each piece successfully added, the design becomes clearer and the clover gradually takes its final form.
The clover, remade
With the final pieces in place, the mosaic clover finally comes into focus.

The emerald glitter cardstock handled the cuts beautifully, and assembling the pieces was as satisfying as I had hoped.
I was genuinely happy with how the design turned out. It worked even better than I expected. The clover had the movement and softness I hoped to create, and the emerald glitter cardstock caught the light in a way that brought the clover to life.
After finishing the first card, I assembled a second one. When I’m working with mosaic designs, I like to make more than one card to see if I can reproduce the result.
Seeing the two cards together confirmed it. The design held up a second time, and the spacing and alignment were just as precise.
One small surprise appeared once the cards were finished. The center of the clover reads almost like a perfect circle—something I hadn’t planned, it's an unexpected detail I love.
Four clovers, years apart
Placing these four clover cards side by side tells a story about my growth as a paper artist.


The original cards came from curiosity and experimentation.
When I made my first two four-leaf clover cards, designing cards solely my own artwork felt entirely out of reach. I was learning how my tools worked, trying different materials, and discovering what paper could do.
That learning took years of practice, mistakes, and plenty of trial and error as I grew more comfortable with the tools and my ability.
Seeing all of the cards together really helps demonstrate the shift from assembling designs created by others to designing my own mosaic paper art.
What comes next
Designs in the Mainely Cards studio rarely stop with a single version. Each card opens the door to new possibilities: different papers, new colors, and small adjustments that change how a shape behaves on paper.
The emerald green mosaic clover is just one interpretation of the design.
I’m already thinking about other paper variations to explore. That is part of the joy of working with paper. One idea leads to another, and the next experiment is never far behind.
The mosaic clover paper art card represents the first St. Patrick’s Day design in the Mainely Cards Holiday Collection. This design is planned for release ahead of St. Patrick’s Day 2027.
If you’d like to know when the clover cards become available, you can join the Mainely Cards mailing list below and select St. Patrick’s Day Clover Cards as an interest.
In a way, the mosaic clover design brings the story full circle—from the St. Patrick’s Day cards I sent as a child to the ones I now create in the studio.
From Maine,
Shannon


